Wednesday, August 18, 2010

Lightning Photo

The light show we got last Friday night was so much FUN!  One amazing moment, I was able to get this photo.


The actual lightning tracing across the sky was phenominal!!

Here's the delima I face.  I will ponder "aloud", and if any of you have ideas, suggestions, or whatever, please comment and let me know!

Obviously there is a large part of the shot that is "blown out" - meaning, there is so much light that all you can see is white.  It cannot be adjusted in any way.

Here is an edit I did in PSE (Photoshop Elements).  I tried to darken the photo enough to be able to see the rest of the lightning without making it look completely fake.


No matter what I did, the middle was still just a white blob.  If I darkened it to the extreme, it looked somewhat contrived.  (and still had a large blown out middle.)  Although, now that I'm looking at it from the school's computer, it doesn't look all that bad....  What do you think?  Which one looks better on your moniter?


I wonder if I should use a polarizing filter or some other kind of filter while shooting lightning in order to avoid this.  OR  Is it completely imposible to avoid this kind of blow out when there is that much lightning at once??  Anyone have any thoughts or ideas??

Of course, I'm thrilled that I even captured it at all!!!  What a light show it was!  More pictures of it in this post here and of the clouds and sunset that night here.


Much Love!

Tiffany

Tuesday, August 17, 2010

Sky Painting

The sky has got to be the most amazing canvas in all of creation!  It is constantly changing, moving, shifting, reflecting, absorbing....  I love the sky!

And I love storms!

During last Friday's storm, which you have already read about, the sun set.  OH WOW!  The colors in the sky were literally un-believable.  When the windows in my home started glowing the color of cantaloupe, I grabbed the camera and headed outside.

This is what the sky looked like from my front door.  (this is before I grabbed the tripod and started shooting the lightning that I posted yesterday.)


As the lightning drew my attention toward the storm in the east, I saw this rainbow.


The color you see in all of these pictures was the actual color of the sky!  I haven't done anything to enhance them or change the colors.

To show you the contrast and how cool it was, I took bettyl's idea from the comments on the post about the cliffs and downloaded autostitch from this site.  I had taken several shots from the middle of the street in front of the house with the idea of a panoramic.  This is the entire 360 degrees of the sky at sunset that night.  It wound up being kind of small, so I hope you can see it on this page.  I'm very happy with it though.


I may change the page and put this at the top of the blog where the flowers and canoe are now.  Hrrmmmm.....

I wish I had thought of this at the time - obviously it's too late now.  I should have turned the camera to take several portrait shots of the sky side by side so that my picture would have a little more height.  **sigh**  Oh well.... it's the process of learning, right?


Much Love!

Tiffany

Monday, August 16, 2010

Friday Night Storm

We had an AMAZING electrical storm this past Friday night.  I went outside after the storm had passed us and took pictures as it headed east.  The lightning was EVERYWHERE!!!  and it was nearly continuous!

I set up the tripod on the front deck and just kept snapping.  I missed some, of course, but I caught quite a bit!  I just kept snapping and snapping.  After I went inside, I just deleted any photo that didn't have lightning in it.  I took over 300 shots and ended the evening with over 70 that had some kind of lightning in the shot.

Here are some of the better shots I got.  I will show you the BEST shot tomorrow as I have some questions and things I'm pondering about it.  


I'm seriously considering trying to figure out how to do an HDR image.  (Combine two or three images so that they overlap.)  I think those last two images combined would be a very cool shot!


Much Love to all!

Tiffany

Saturday, August 14, 2010

Darts!

My husband LOVES to play darts - and that's an understatement!  I have always wanted pictures of him playing, but they are difficult to get for many reasons.  

The biggest hurdle is convincing my man to let me take the shots!  He never used to like when I got the camera out. But after supporting me through this summer's photography adventures, he has begun to be quite open to the camera - as long as he's helping me get the shot and not actually IN the shot.

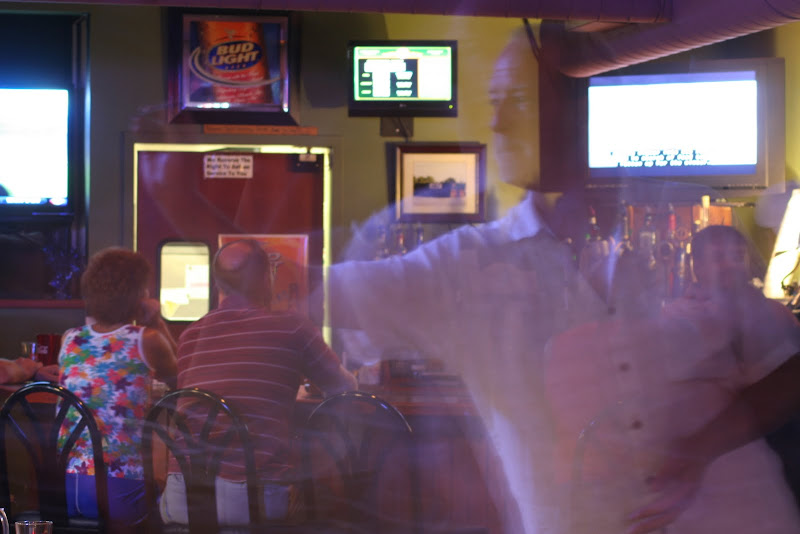
When one of the Digital Photography School's assignments was a picture with "motion blur" of a person or animal, it was the perfect opportunity to ask him for help!

Once he was convinced to let me try (and even excited about the idea!), there were the other issues....


1)  Carrying a camera and tripod into the local pub...  We waited until the right time of the evening when there weren't that many people there - and those that were are "regulars" and already know us.  Even so, it made several people nervous, so I did not even TRY to take anyone else's picture that night.  I thought it would be better for them to get used to the idea of me with a camera in a non-threatening way.

2)  Low Light!!  I took many shots (about 50 or so) and kept adjusting the ISO and shutter speed.

3)  The shutter speed itself.  I wanted a blur that showed the motion of throwing a dart, but I started with a shutter speed that was way too long.  This got me several shots of ghostly arms that looked like they weren't attached to bodies!  Each shot I sped up the shutter speed, then had to fix the ISO......  it took a little while. 

4)  Actually capturing the movement.  As the shutter speed was faster and faster, I had to really watch to capture the actual throw.  I missed it several times.  Most of the dart players I know are very still while they aim then the actual throw is like a snap.  Very fast!

5)  Camera angle (????)  Where to set up the camera, on a tripod, in a bar, where it won't bother the person throwing darts, be in the way where either the camera or I might be hit by the darts, out of traffic so I don't get run over or have random people walking through the shot.....  It took a while to get this one right!

Anyway, here are a few of the shots I got that night. 


The first angle I tried... 


Too much blur - not enough action...   Also the TV in the background is distracting


WAY too much blur!  Lots of action though...

So I tried a different angle.


A little better.  No movement though.  I couldn't decide whether to focus on the hubby or the dart board.  But since the hubby is moving and the board isn't, that seemed the answer.


Shutter speed still too slow.  There are the ghostly arms I was talking about


Too dark!!  Ack!


This is the one I ended up submitting.  It's not perfect by any means, but it is much closer.


The important things for me were - A)  Learned a bit about shutter speed and motion blur.  B)  Learned a LOT about shutter speed, low lighting and ISO, and C)  Got husband excited about being in a picture!!!!  BONUS!!  :)
Much Love, 

Tiffany

Friday, August 13, 2010

Morning Delight!

One of the wonderful things about going back to school is...


I get to drive straight into a wonderful sunrise nearly every morning!!!

Thursday, August 12, 2010

Photo Copyrights (Number 2)

Continuing from yesterday's post about the How and Why of Copyrighting, today I will show you the steps I take to watermark the photos I have.

I use Photoshop Elements 8, but I think most Photoshop programs are fairly similar.  So, if you have Photoshop brand photo editing software, this should pretty much work for you.  If you use something else, you will need to figure out how to find the "text" function in your program.  The rest should be very similar.

First, let's assume that either the photo you have is fine the way it came SOOC or has already been edited the way you want it.  You don't want to edit the photo once the watermark is there, or you will edit the watermark as well.  Save this step for the VERY LAST thing you do with your photo.


Once the photo is ready to be watermarked, chose the Content button on the side panel.  (Note, if Content isn't one of the options on the side panel, go to the "Window" menu at the top and check "Content".


In the Content window, you will want to chose your desired text color.  If you click on the little "T" option, only Text options will show up in the window.  Otherwise you also get many different things like frames, stamps, etc.


Choose the Text you would like to use and click apply.  This is the one I use most often but not always.


After you click on "apply", a text box will appear in the middle of your picture.  Mine says, "Your Text Here" and is ready for me to start typing.  In order to type the copyright symbol © on a PC, hold down the Alt key while you type 0169 (then let go.)  I don't know if the same applies for a Mac...  If anyone out there does know, would you kindly let us know in the comments for today?  Thank you!!!  :)  You can type and change the font, text size, etc. just like any word processing program.


Obviously, I use "© Tiffany Bonnewell" on my photos.  I haven't decided if I'm going to stick with this or try to come up with a name for all of my photo collection.  I'll let you know when I do decide.

Anyway, here the copyright has been typed and is ready to move where I want it on the picture.  Just click anywhere outside the text box, then click and drag.  (make sure you are using the "move" mouse option in the menu that I have circled on the upper left side here.)


Once that is step is complete, you can now adjust the "opacity" in order to get the words to be "see through".  This is more of a watermark instead of a signature, but you could do either one!  :)

To adjust the Opacity, click on the layers button, chose the layer of your typed copyright,


Then find the Opacity slider and move it.  I usually play with it to find what I like best.  Each photo is a different amount depending on the darkness of the area where I put the watermark.


Once it looks the way you want it and you are ready to make it permanent, you must combine all the layers into one photo.  This is called "Flattening the image".  In order to do this, just click on Layer and chose "flatten image".


Now you are finished!  Except you need to save the image you have watermarked.  REMEMBER TO SAVE IT IN A DIFFERENT FILE THAN THE ORIGINAL!!!!!  I'm sure you know how to do this, but for the sake of thoroughness, go to File and chose "Save As..."  This will pull up the files where you can chose a place to save the edited photo.


Here is the finished product:


Tah Dah!!!  :)

I hope this made sense.  Let me know if you have questions about it.


Much Love, 

Tiffany

Wednesday, August 11, 2010

Photo Copyrights (Number 1)

As I expected, school will mess up posts this week a little.  My apologies!  I will try to get a system lined up so that we don't miss any photography while school is in session!!  :)

Yesterday, SouthernSass asked an excellent question in the comments section - "How do you copyright your photos?"  Now I'm not sure if this meant the actual legal copyright or just the watermark that I have put on my pictures.

So, I'll answer both!!  :)  I know, I'm awesome.... no applause, please, just throw money...  ;)

(Sorry, I get a little nuts during the school year!)

The first question - How do you legally copyright your photos?

There were a lot of important things I learned over the course of several library books this summer.  Specifically, while we all realize that a photo is the artistic property of the person who took it and it's illegal for someone else to use it without your permission, that doesn't mean you are protected from copyright violation.

In order for you to be protected you must register each and every photo individually with the federal government's Copyright Office in the Library of Congress.  (I'll tell you how at the end of the post!)  :)

Of course, I'm referring to USA laws here.  I don't know about the laws of other countries, but I assume they are similar.

Let's give an example....

Example 1:  John Doe posted a beautiful photo of a flower on the internet.  Several months later, he sees this exact photo in the background of a billboard advertisement for a local company.  John Doe contacts the company to complain and insists that they remove his image from their ad or pay him the money that he should have received for it.  Since John has not registered his photo with the federal government's copyright office, the most he can hope is for the company to agree to remove his photo from their ad.  If they do not voluntarily remove it, he could hire a lawyer to sue them and make them.  However, without that registered copyright (even if there's a copyright logo written on the picture), the most he could see from a lawsuit is the removal of the photo and any money that was actually paid to someone for the picture.  There is NO money that should have been paid, or damages or court costs....  just what was actually spent - and you'll need to find a receipt to prove that it happened!!!  

Because of this, many people will steal photos and get away with it.  As you can guess, John Doe will not press any charges because he will spend a lot of money on lawyers and expenses just to get a photo removed from an ad and not see any kind of reimbursement.  If the publisher of the ad is the one who stole the picture, they didn't pay anyone for it.... No money paid = no money for John.

Example 2:  Jane Doe has many pictures that she would like to copyright, so she registers them with the Copyright Office in Washington, DC.  When she is surprised to find that someone has used her photo just as they did John's, she calls an attorney.  Because her photo is registered, her attorney can file suit, have the photo removed, sue for the amount of money that should have been paid for the use of the photo (whether or NOT it was actually paid to anyone),  sue for court costs, attorneys' fees AND pain and suffering damages!! 

For this reason, I have come to find that professional photographers don't mind posting their photos on the internet.  They do not fear someone stealing them.  One photographer even commented that, as long as the copyright watermark is left on the photo, it is free advertising for him.  If the photo appears in a way that would have earned a significant amount of money, they call their attorney.  Often, the issue is settled out of court once the offender finds out what they are up against!

So - we return to the question, HOW do you register your copyright and your photos with the Copyright Office?

Go to this link here and you will find the official form for registering Visual Works of Art.  The instructions are on the form.  You will need to send a copy of each and every photo you want to register, but they can be thumbnails instead of full-size files.  It will need to be big enough that a judge could look at it and the offending image and recognize that they are indeed the same.  You can register as many photos as you can fit on a single disk (or one zip-file if you file online) for one fee.  (current fees are listed at www.copyright.gov.  Right now, it is $35.)  One of the books suggested burning images to a DVD because you can literally fit thousands of photos on one.

NOTE - The registration of the photo must have occurred BEFORE any incident of wrongful use in order to be copyright protected.

-------------------------------------

I hope this answers your questions somewhat.  It's turning into a long post, so tomorrow I will walk you through how I watermark my images in Photoshop Elements.

And because I don't think I ever want to have a post without a photo, here's one from our trip to Worlds of Fun.


Remember this movie????  :)


Much Love to All,

Tiffany